This material is about preparing for the final. The Description of the homework for next week is below.
Final Project
You guys will be turning in a very short animation. You will have the rest of the semester to work on it, and I will help you throughout the process.
I will do demonstrations based on what your needs will be for your finals. For example, if someone is doing a walk to a run to a jump, I might show you how I would get that done. If there are any challenges with your idea, please let me know and I can prepare something to show in class.
As you can see, there is a wide range of projects you can do. You can do a lip synch dialogue, an action, dance whatever. If you want to take from 11 second club feel free. Here is another rig I showed in class: http://www.bloomsbury.com/cw/cartoon-character-animation-with-maya/student-resources/mr-buttons/ HOMEWORK Part 1 Spline and finish your head turns! Use the feedback from class to finish off this assignment. Part 2 FINAL (finally!)
FINAL ASSIGNMENT:
Final Phase 1
-Pick something to animate. Can be action, dance, dialogue (sound) (within reason).
Choose audio if that is what you are animating to.
Use your sketchbook and jot down your ideas and thumbnails about shots, actions, composition.
Scan sketchbook and email to me so we can look at it together. Bring any kind of reference to show us what you would like to accomplish.
Must talk about your ideas next class.
Have at least 2 ideas. I will decide if they will be manageable. Remember to have fun! Pick an idea that interests you.
Hello everyone! Here are some helpful references on the topic of head turning. Hopefully these will reiterate what I went over in class, and you can use these as helpful reference for when you are doing your homework assignment.
Please take note, there are many different ways to do a head turn. A neutral head turn is completely valid, but whatever the emotion of the character might be would also affect how the turn is happening. For instance, my animation that i worked on in class the other day was of a scared man. He turned his head quickly, looking around to make sure nothing will hurt him. If someone is relaxed, they might turn their head more slowly.
Topics Cover in Class
My animation that I made during class:
aTools
I used the tween function of aTools quite a bit. I hope you guys will continue to use it and become familiar with powerful a tool it can be. As a reminder, here is the youtube video demonstrating aTools and how you can use it:
Review of Morpheus Face Rig
Please watch this video if you need any reviewing for the face rig on Morpheus. Start at 14:30 to begin right at the face.
If there is anything I showed in class, and it is not review on this blog please email me with any questions or additional information you might need!
GRADES
On a separate note, I would like to sit down with each of you and talk about your grades. I realized I haven't given you any yet, but I do have them for your previous projects. I will discuss them with you so you know how you are doing in the class, and you can also mentally prepare for the final which will be about half of your final grade. I will be emailing each of you to begin a conversation about meeting up.
HOMEWORK
Part 1
Please revise you run cycles based on the feedback given in class. Practice makes perfect! I guarantee the more run cycles you do the better you will get with each other. I will be looking at how the speed feels, if it is readable, how are the arcs on the feet and hands, and overall if it is believable enough. Please refer back to the previous blog post for reference.
Part 2
Based on what was shown in class, and the reference I provided in this blog post, please create your own head turn. This is your chance to get creative. Don't just rotate the head and blink the eyes. Make me feel the turn in the body and the shoulders. Create an expressive face that might communicate what your character might be feeling on the inside. Please feel free to explore and experiment. Remember you are creating art. Let's see some emotion! Don't forget to create a new perspective camera to view our animation with. I usually rename it "RenderCam" which is what many studios do. Find a good place for this camera, and lock it in place by locking attributes, or just keyframe it. Make sure this camera view is the best angle for viewing your work. Remember what I said about the eyes. Our animations will work much better when we see both eyes in the shot. Use your RenderCam to figure that out.
*I will give you bonus credit if you film yourself doing these actions for reference. ACTING!! If you do, please them along with your final animation. so we can see how you did it. If you want to do this for your walk cycle revision, feel free to do so* Before the next class begins I would like to have quicktimes of all of your run cycles and headturns. If you have not turned in your revised walk cycles, please do so as soon as possible!! So far, I only have Fernando's.
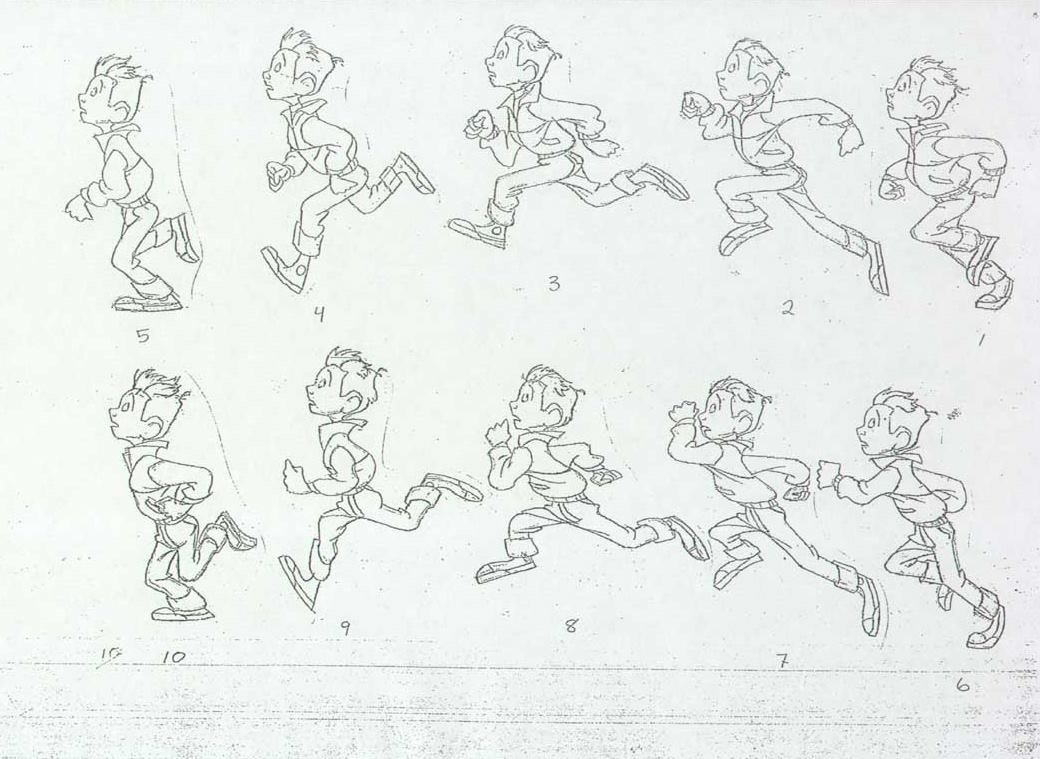
Hi guys. Here are some inspirations and references for your run cycles.
This video shows something that is interesting to note. This girl is shown landing on the balls of her feet instead of her heel, which is what I showed you in class. That's ok! That's very realistic, since jogging this way is better for your knees.
I have tried to find running tutorials, but the ones I see are not very good. I think by now you should be comfortable keyframing in maya., and you know what kind of poses you want to hit.
HOMEWORK
Based on critiques in class, please revise your walk cycles. Polish them up! Perhaps you can use it on an animation reel!
Next do a run cycle! Bring it to me splined and as far as you can take it. We will critique them in class.
Review Last class I showed everyone how to spline your walk cycle and how to focus on certain areas to refine the walk cycle. In this post I will add some supplemental material to expand on what was covered. For those who are still figuring out the graph editor, here is a good video to study:
Here are other resources for animating walk cycles. Keep in mind these are done with different rigs. Many controls may be different but they should essentially be doing the same thing. Watch these videos and try to pick up on what these animators are focused on:
There are many ways to begin animating a walk cycle. Mainly I want you to watch these so you can think about all the moving parts of a walk cycle. Remember when I had you all draw? Use that same eye to see what works in a walk cycle. Does the up and down feel good? Does the body twisting feel natural? Do the arms swing in a natural way? Please search youtube for more walk cycle videos. There are a lot of them. Hopefully you will begin to see a pattern arise, and understand what goes into a good walk cycle.
HOMEWORK Please spline your walk cycles and refine them as much as you can. Act as if you are going to finish them. They can still be walking in place. If you are not sure when you are ready to spline them, feel free to select all your keys and choose to do auto tangent, or spline. If you see any glaring issues or problems, just begin to fix them one by one.
Make sure it feels natural. Watch as many people walk as possible, and try to observe what the body is doing. We will look at them in class and critique them. Please have them playblasted and emailed to me before the start of the class. No matter what, email to me wherever you are on this assignment. Contact me if you have any questions!
Hello everyone. In this blog post, I have a refresher on how some of aTools works. Also I have provided some references for walk cycles. Atools for maya at home (click to save) Tutorial Video on aTools:
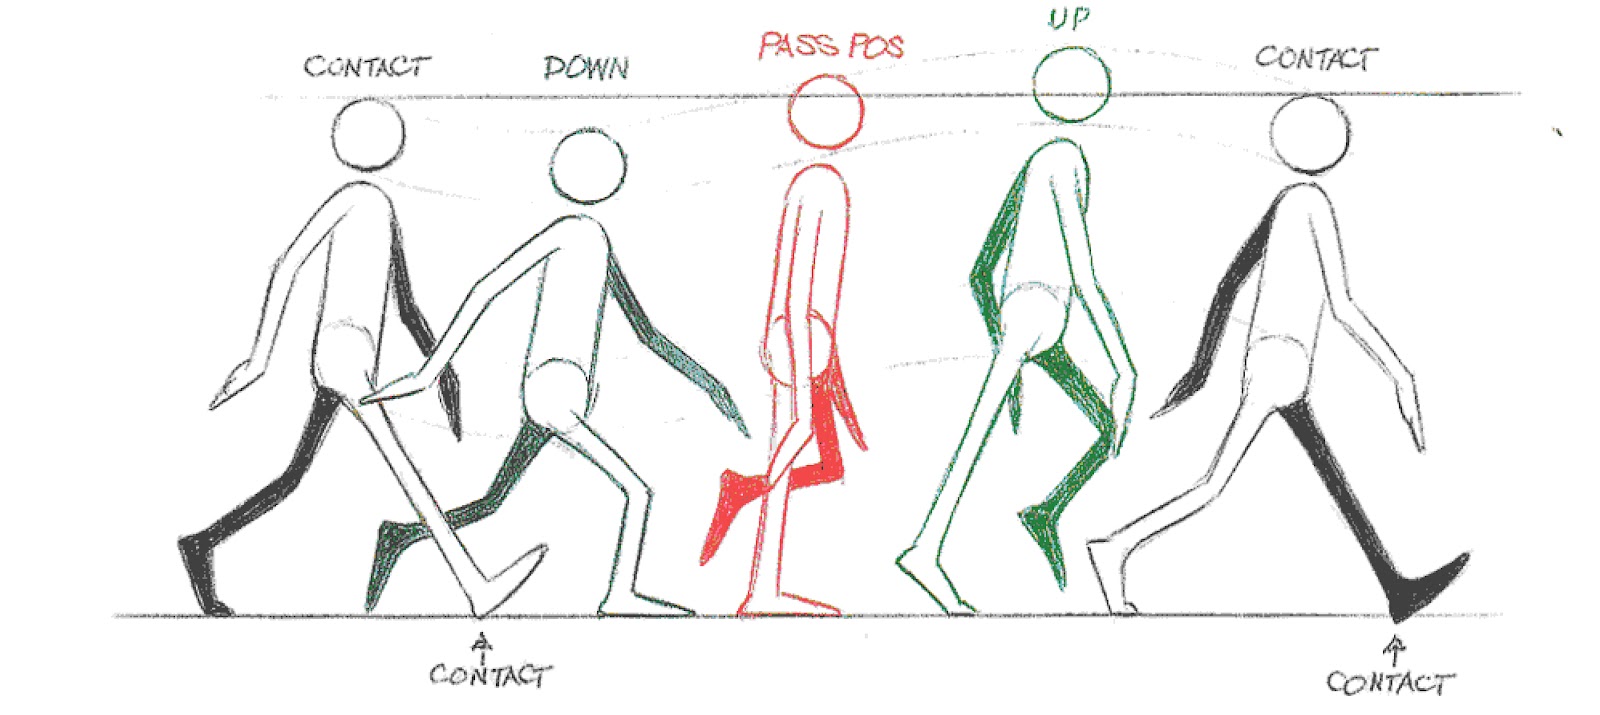
Walk cycle images:
Other Walk Cycles;
Homework!
Please put together stepped walk cycles exactly how we did in class. Start over, or work on the one you started in class. I think you can benefit from starting over, so you can learn from repetition. Don't forget to use aTools to save time. Mirror poses, or use the tween function. Use the images provided if you need references for which poses you would like to have in your walk cycle. Please work on your poses and timing until you feel like they look like good blocked walk cycles.
For next class I would like to see a quicktime of your walk cycles. Please playblast them and email them to me before class begins. We will then take those and I will show you how to take them a step further and refine them.
If you need help or advice, please send me an email!