Thursday, February 23, 2017

Class 5 2/23/2017


This class we took a look at your walk cycles and then I demonstrated a run cycle.

Items covered in class

-Gimbal lock rotation
   -Very complicated, but you will run into this.  Google for more information if you are not clear.
   -Euler filter
   -Using the extra gimbal controls for the arms on the Norman rig.
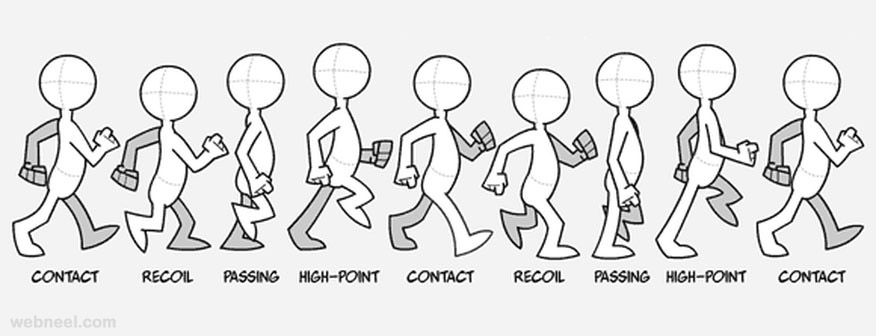
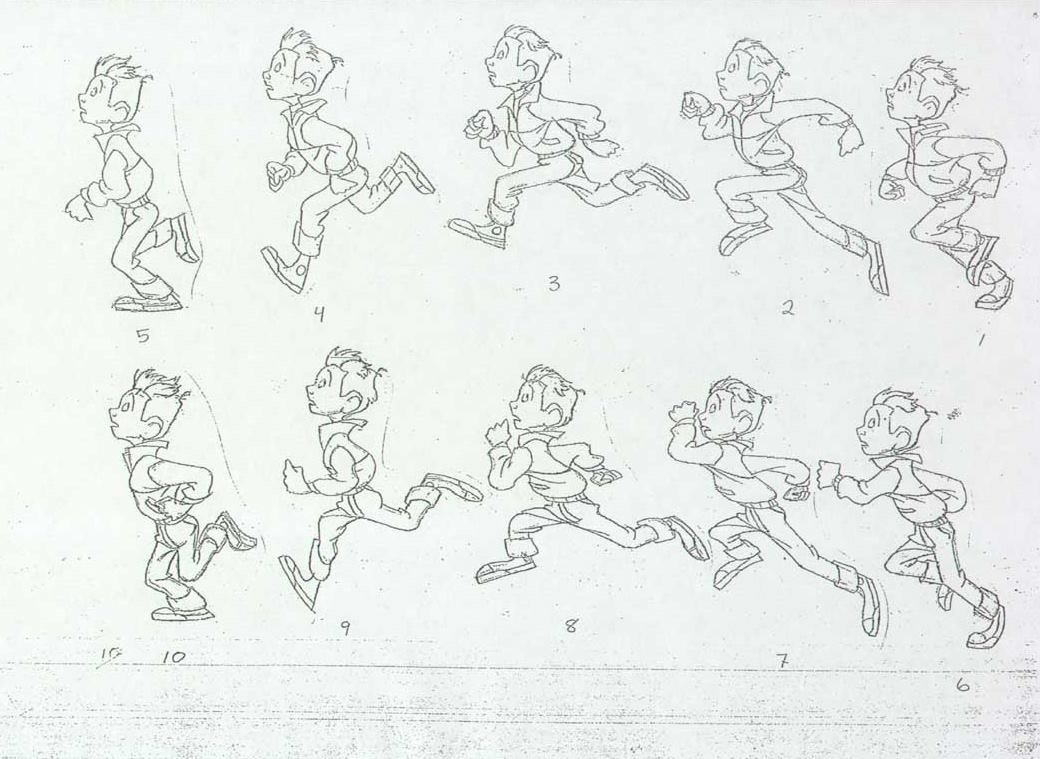
Run cycle
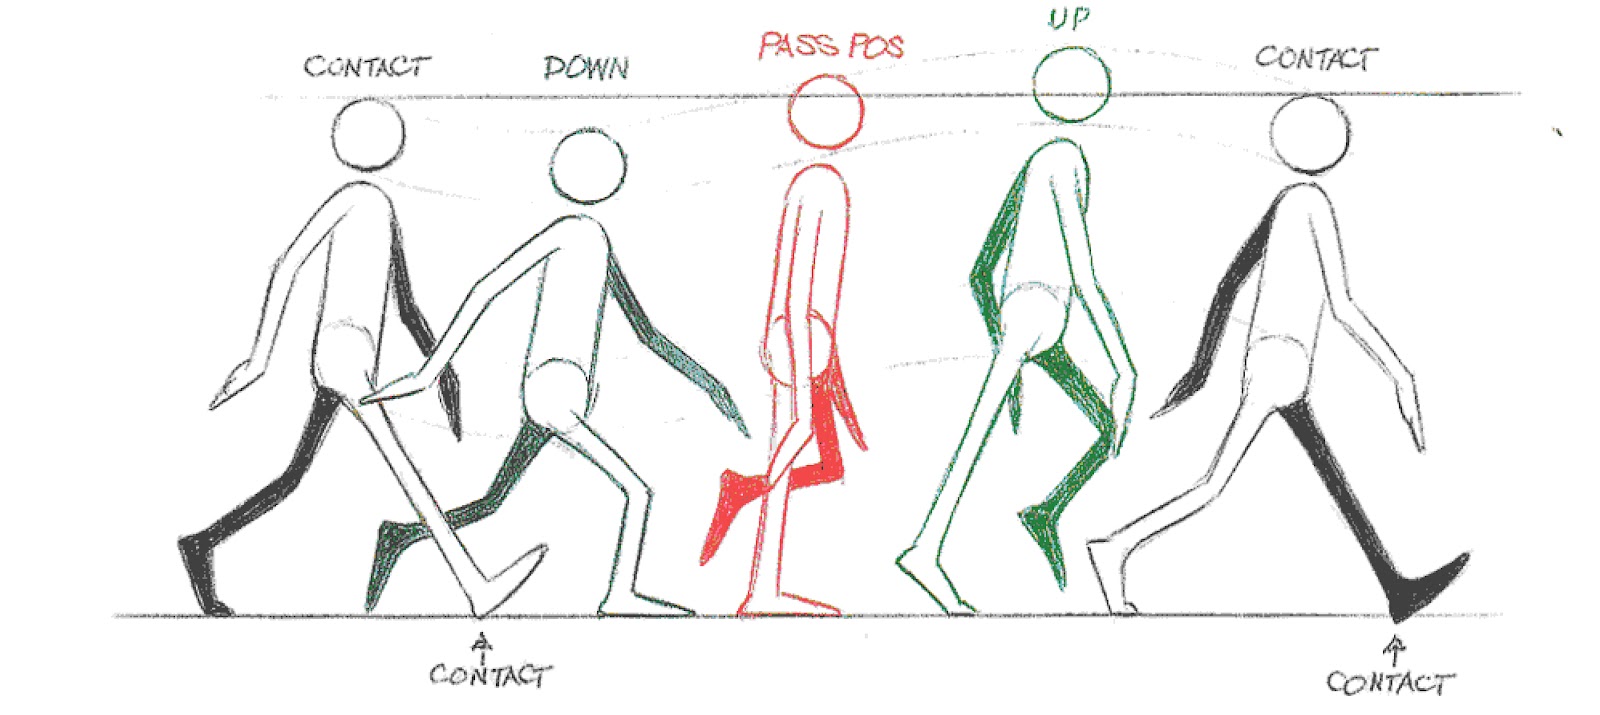
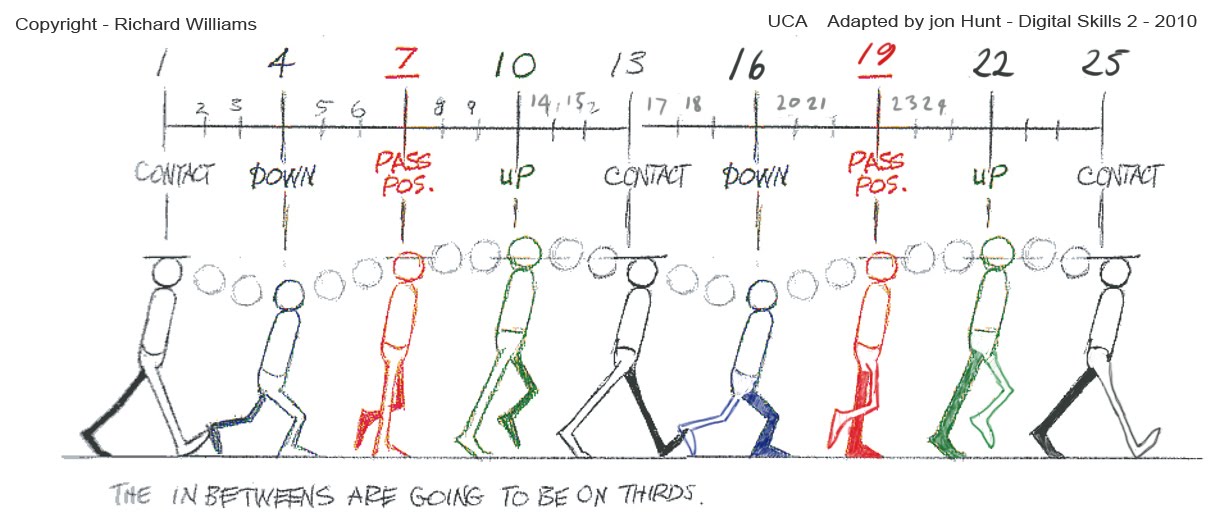
   -Run cycle is different from walk because both feet never touch the ground at the same time
   -Many mechanics are similar to walk cycle such as, twisting of shoulder and hips, torso up and down motion, and torso/spine/head rotation.

Graph Editor
   -You can isolate certain curves by selecting which channel you want to see and then going to Show > Show Selected Type(s).

Run Cycles

Here are some references for your run cycles.


This video shows something that is interesting to note.  This girl is shown landing on the balls of her feet instead of her heel, which is what I showed you in class.  That's ok!  That's very realistic, since jogging this way is better for your knees.


Chiari Porri
I recently found this animator's vimeo page from a friend.  She has great tutorials on how she does and walk and run cycle.  Please watch these so you can supplement what you already know.  

BTW I know this eleven rig seems appealing, but as you can see from her walk cycle video starting in Maya 2015, the rig starts to break.
HOMEWORK
Based on critiques in class, please revise your walk cycles.  Polish them up!  Perhaps you can use it on an animation reel!

Next do a run cycle!  
-Please playblast 3 quicktimes, one for each camera angle.  Those angles are front, side, and RenderCam.  Please email them before class begins.  We will critique them at the beginning of class.

Wednesday, February 15, 2017

Class 4 2/15/2017

Hello everyone.  Today we looked at how to create a walk cycle.

Topics covered in class:


-Animating a walk cycle in place.

-Posing key poses for walk cycle using the animators survival guide as reference.
 Adding break down poses in between the key poses.
Spacing the key frames of the poses so that the timing works right.

-Mechanics

 Feet alternate opposite the arms. Example is when right foot is forward, left foot is back
 Hips and shoulders have opposing rotations.
 Torso moves up and down.
 When animating feet, use heel and ball roll channels to move foot on appropriate pivots.
 Animate torso, chest and head to feel the weight of the body moving up and down.
 After animating the shoulder rotate on your FK arms, you can add animating to the elbows and wrists.  Offset set each from each other to obtain a nice staggered motion.  Order of animation would be Shoulders>Elbows>Wrists.

-Setting timeline so that your last frame isn't rendered when playblasting.  The last and first frame will be the same and you dont want that frame playing twice when you are looping.


-Cycling Animation in Graph Editor.

Have infinity turned on to preview the curve.

-Quick Select Sets

 On Norman I set up a quick select set so you can select all Ctrl Curves even if some are hidden.  
 Right click on Quick Select Set in Outliner and choose "Select Set Members".

-Tweening in aTools


Atools for maya at home (click to save)

Tutorial Video on aTools:


A NEW NORMAN!


In regards to the Norman Rig, I've created a new version of Norman with Quick Select Sets.  I've also added Shader CTRLS which you can use to color each part of the body.  I hope it is easy to understand, but if not I will go into more detail next class.  Each Shader Control corresponds to geometry on the body.  Each Shader Control has channels for R, G, B, and Shiny.  If you are familiar with how RGB color works, you should be able to figure out how to use the values.  0=1 and 1=255 in the case of the controls I have created.  I have already colored the arms and legs for you.  Feel free to play with the values and see what colors you can get.  The channel for Shiny should be self explanatory.  You can add highlights or take them away.  Again, this is not crucial for you first pass of the walk cycle.  I can explain the setup for next class.  I will email this rig to you.


Walk cycle images:

This man here is an inspiration.  This person was not an animator before, but he decided he wanted to try it.  Everyday for 100 days, he tried to animate a walk cycle.  You can see him getting better and better with each try.


Other Walk Cycles:


Other Tutorials:


Felix Sputnick's animation videos, which are very insightful


Eadweard Muybridge, the photographer who studied motion.

Homework!

Please put together a first pass of your walk cycles.  Don't forget to use aTools to save time. Use the images provided if you need references for which poses you would like to have in your walk cycle.  Please work on your poses and timing until you feel like they look like good walk cycles.

I forgot to mention in class, I would like you also to film yourself walking.  Use this as reference, but also to think about how each part of the body moves.  This is required.

For next class I would like to see a quicktime of your walk cycles and your references if you have them.  Please playblast them and email them to me before class begins.  We will then take those and I will show you how to take them a step further and refine them.

If you need help or advice, please send me an email!

Also please don't forget to send me your updated ball bounces by at least next class!


Thursday, February 9, 2017

Class 3 2/9/2017

Hello,

Last class we went over your first pass at the ball bouncing animations.

I then clarified how I think you should set up your playblasts for homework.  Make sure in your render settings you have your resolution setup to HD1080.  In your playblast settings, you can have your Display size be set to "From Render Settings".  Set the Scale to .75.  I know in class I showed you .5, but .75 will make it bigger.  Also don't forget to turn off your resolution gate.

Maya Display
I talked about display setting and how you use the number keys to toggle between them.

1 - Low/Hard Poly
2 - Smooth with proxy
3 - Smooth display
4 - Wireframe
5 - Solid shaded
6 - Textures on
7 - Lights

Maya Projects
   Setting the project

   Creating folder structure
      save rigs in assests folder
      save animation files in scenes folder
      your playblast will appear in movies if you save them


Norman Rig
Then I introduced you to the character rig called Norman.  I explained all his body part controls.  Here is the link to the site, and information about the controls.

Rig Website
Norman Manual

I also described the difference between FK and IK.

I lightly touched on how you can modify his shaders to change his appearance.  This is not required for the class, but I wanted to show you in case you would like to customize.  Essentially, you would alter his shader or reassign a new shader to his various body parts.  The rigger made sure you can't select the geo in the viewport, but you can find the geo in the outliner.  take this opportunity to become familiar with how the rig is organized, and how to navigate the outliner.

Creating a RenderCam
I talked about creating another perspective camera, and renaming it "RenderCam".  This is the camera you will be playblasting from.

You can change focal length to alter perspective, but I suggested leaving it at 35.


Work I showed in class:
David Oreilly

The External World from David OReilly on Vimeo.

David Oreilly Character Rigs


Homework

-Please fix your ball bounce animations based on the critiques in class

-Take 10 of your drawing poses and pose the Norman Rig with those poses.  You can key each pose for 10 frames and playblast it as a quicktime.  You may use IK or FK for the arms.  Which ever you are most comfortable with.  It is not important which you use since we are not animating.

Thursday, February 2, 2017

Class 2 2/2/2017

Hello!

During our second class, we took a quick look at your drawings, and will save them for later when we pose a 3D character in Maya.

I continued to talk about maya animation tools while also demonstrating my approach to animating a ball bounce.  First I animated the ball bouncing up and down, and than added some forward movement.  Following this I began to add squash and stretch.

When animating the ball, the main controls you will be using is the move, rotate, and the top squash control.  There is a bottom squash control, but I don't think you need it for what I demonstrated yesterday.

Other topics covered:

   Explained how curves are used in Maya, more specifically, for animation.
      We always set keyframes on curves.  Not geometry.

   Describe the nature of Maya assets, or "rigs".

   Explained how to reference a rig into maya and why we do it.

   Holding "i" and middle mouse release to add keyframes in the graph editor.

   Explaining keyframe and value snapping in the graph editor.

   Demonstrating weighted tangents in the graph editor.

   Showing how to use the motion trail tool for visualizing the path of your animations.  Take      note that it is glitchy and may not work as intended when editing actual animation.

   Demonstrated how to add a file texture to the ball, and save a new version of the rig if that    is the animator's desire.

   How to render, or playblast your animation.  

   Described setting the resolution of your animation and how to enable the resolution gate,      so you know how to view the edges of your composition.

Ball Bounce reference:

Here are some materials to help you in your ball bouncing exercises.  They range from images to youtube tutorials.  If you seek more information that I provide, please feel free to search google or youtube for more resources.  There is plenty out there to assist you!


Supplemental tutorials:

Setting Key Frames

Graph Editor

Ball Bounce

Ball Bounce

Home Work!

Please do two ball bounce animations.  One without squash and stretch, and one with squash and stretch.  The most famous examples of the two might be a billiard ball, and a basketball.

Please playblast a quicktime for each animation.  Please be mindful of where you place your camera when playblasting.  Try to think of the most interesting angle and compositon that best shows off your animation.

Email me these two files before class begins please!