Wednesday, November 9, 2016

Class 12 11/09/2016

Notes from class last night

Characters holding objects
I talk about parent constraining a prop to your character's hand.

Props are usually rigged under Control Curves.  I usually use about 3, but you can make due with 2 or 2. 

Make sure the geo is parented to the lowest curve in the hierarchy.
Make a group null and put the top Control Curve under that group null.  That Group null you may call buffer, and use that to parent constrain to your animation wrist control.

The hierarchy will look something like this.

PropMasterGRP>PropBufferGRP>PropMasterCTRL>PropCTRL02>PropCTRL03>PropGEO

It is good practice to create your prop rig in a separate file and reference it in.

I used add attribute on the top rig control to create a custom attribute for toggling visibility.

I then used set driven key to connect the attribute to the visibility of the geo.  Please google set driven key for tutorials if you want to be refreshed on the concept.


Throwing objects

When I throw objects, I would rather toggle the visibility of multiple objects than trying to keyframe the parent constraint.  Usually I do this by referencing a prop twice, and parent constraining only one to the hand.

Creating shot folder hierarchy
Once your layout is all set, break up your maya scene into separate files.
Animate in those separate files and render from them.
Edit those clips in after effects.

Videos about cameras and character placement:


HOMEWORK

Once your layout is in a good place, begin animation blocking.  Break up your maya layout scene into separate shots and add more detail to your poses, animation blocking and timing.  Bring in your updated edit next week, so we can critique your progress.

Tuesday, October 25, 2016

Class 10 10/25/2016

In today's class, I outlined what I would like to see in your final assignments.  I showed more examples of Animation planning, and some videos that will hopefully inspire your ideas.  You will have the rest of the semester to work on your final, with it being due on the last day of class.  Each week's assignment will be to work on various aspects of the animation process.

Animator Acting reference:
http://i.imgur.com/UWmcpFk.gifv
http://i.imgur.com/mK9ZmYP.gifv

Animation using real baseball game as reference.
https://i.imgur.com/cNjgPH1.gifv

Every Frame a Painting. 
These videos give some ideas and knowledge about how you can use the camera to enhance the actions you are trying to show.  Remember, you do not have to be as elaborate as some of the examples shown here.  I just would like you to see all the possibilities that are available within the frame of the camera.

Drive (2011) - The Quadrant System from Tony Zhou on Vimeo.
Wolf Children (2012) - The Lateral Tracking Shot from Tony Zhou on Vimeo.
Edgar Wright - How to Do Visual Comedy from Tony Zhou on Vimeo.

Some really dumb, but well done animations.

Animator Progression reels:

The last two videos for Ratatoullie, and Monsters Inc, I want you to pay attention to.  These two videos show very well many of the steps I would like you to do for your final.

Another source of inspiration might be the Frame X Frame Tumblr.  Surf this website, and see if there are any animations or actions that interest you.

Mr. Buttons
I've shown this animation before in class, but I will be happy to link you to it again, since it is a nice clip that meets the requirements of the final project.

Blind Date Animation (right click, save as)

You may use the Mr. Buttons free rig if you like, but I would not suggest it for lip synch animation.

HOMEWORK

1) Finish your lip synch animations. 

2) Final Project Phase 1:
-Please come up with at least two animation ideas.  It could be anything from a lip synch animation like the 11 Second Club, to an action, like dancing or fight choreography.
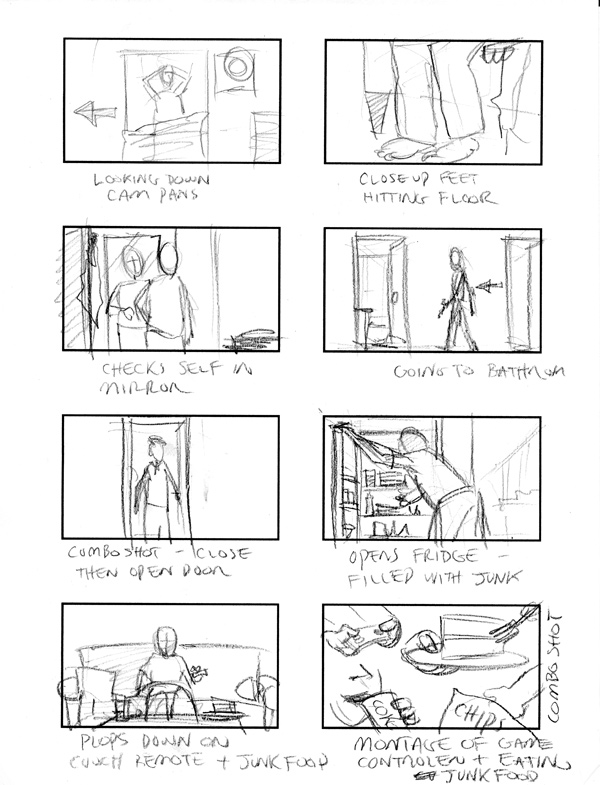
-Sketch out thumbnails of how you would animate these ideas.  If you are not sure what thumbnail sketches are, here are some examples:

-Essentially, the idea is to sketch out the most important points of your story, or action.  Bring in these images and present your idea for class.
-Bring in any material that supports your animation idea.  It could be the audio, video, or animation reference.  Like I said you could surf FrameXFrame for ideas, or bring in a video of a dancer for reference.
-Remember to pick an idea that really engages you!  It will make it that much more fun to work on!


Wednesday, October 19, 2016

Class 09 10/18/2016

During the last class I showed you in more detail how I go about splining your animation from blocking.

One animation I showed to you that really demonstrated eye movement and facial expressions was called "One More Beer!"


One More Beer! from pedro conti on Vimeo.

Homework

Please begin splining your lip synch animation.  What I want to see if movement in the head, neck, and/or chest that adds to the animation.  Really make sure your movements support the dialogue that is coming out of the character's mouth.  Just moving lips won't do.

Thursday, October 13, 2016

Class 08 10/11/2016

Last class we I showed you how I would spline our head turns, and initial blocking of the lip synch.

What I forgot to mention is that this is the Midterm!  This really snuck up on us.  Time flies!

Lip Synch Steps to remember.
  1. -Have audio in .wav format
  2. -Import audio into your shot.
  3. -I usually like to have my timeline set at 4x height.  You can do this in preferences.

Here is a link to see how other animators approach their workflow.  Please look at these and try to keep in mind how you can use different processes for your own work.
An animation playlist about the workflow processes to get inspired.


Here is the drawing reference that I showed in class a few times. Flickr drawing references.

Here are some other videos to watch to see how people animate talking and acting.


I won't post anything about AE since you already have the audio file, and I will be opening AE again in class.  If you are curious to know more about AE, then please google it.


Homework


-Spline and finish your head turns

-Begin blocking out you lip synch
  1. -Film youself saying the word.  Act it out.  Try different options.  Filming yourself is REQUIRED.
  2. -Optional: Sketch out your ideas as well, similar to the pixar images I linked earlier.
  3. -Using stepped keyframes, block out your character animation.
  4. -Don't be afraid to think about what the character is doing before and after they "Ok"

Wednesday, October 5, 2016

Class 07 10/05/2016

Head Turn Animation

Hello everyone!  

Here are some helpful references on the topic of head turning.  Hopefully these will reiterate what I went over in class, and you can use these as helpful reference for when you are doing your homework assignment.


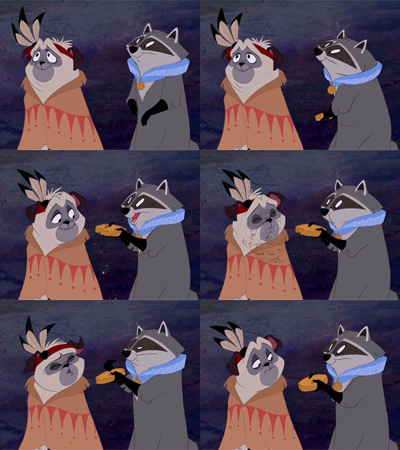
Please take note, there are many different ways to do a head turn.  A neutral head turn is completely valid, but whatever the emotion of the character might be would also affect how the turn is happening.  For instance, my animation that i worked on in class the other day was of a scared man.  He turned his head quickly, looking around to make sure nothing will hurt him.  If someone is relaxed, they might turn their head more slowly.  


aTools
I used the tween function of aTools quite a bit.  I hope you guys will continue to use it and become familiar with powerful a tool it can be.  As a reminder, here is the youtube video demonstrating aTools and how you can use it:


Review of Morpheus Face Rig
Please watch this video if you need any reviewing for the face rig on Morpheus.  Start at 14:30 to begin right at the face.

HOMEWORK

Based on what was shown in class, and the reference I provided in this blog post, please create your own head turn.  This is your chance to get creative.  Don't just rotate the head and blink the eyes.  Make me feel the turn in the body and the shoulders.  Create an expressive face that might communicate what your character might be feeling on the inside.  Please feel free to explore and experiment.  Remember you are creating art.  Let's see some emotion!

Don't forget to create a new perspective camera to view our animation with.  I usually rename it "RenderCam" which is what many studios do.  Find a good place for this camera, and lock it in place by locking attributes, or just keyframe it.  Make sure this camera view is the best angle for viewing your work.  Remember what I said about the eyes.  Our animations will work much better when we see both eyes in the shot.  Use your RenderCam to figure that out.

Please record yourself a few times turning your head and looking.  This is required!  Turn it in with your animation progress!

So in summary I want to see:
1 blocked animation of a head turn.
1 video of your filmed reference.

Wednesday, September 28, 2016

Class 6 09/27/2016

Hi guys!

Please continue to work on your running and jumping animations.

HanJun,

-Please be sure to add more key poses to your animation.  I would like to see the hands and feet really connect to the surfaces they are pushing off of.  Watch as many references as you can and observe how these parkour moves work.
-Work on speeding up your run.
-Simplify your camera.  I think you may only need two shots.

EunYoung,

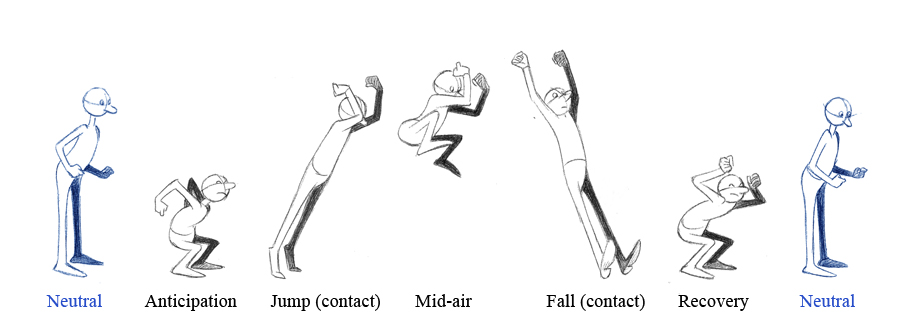
-Work on ramping up your run cycle, and fixing the body as your character is jumping.  Check both realistic and cartoony references and see how the spine moves.
-Simplify your camera move, and try to keep the eye direction of your character consistent

For both of you, remember to watch the timing of your animation.  You both seem to be doing well with mechanics, but could work on your timing.  Shift the keyframes closer together if you want to make something seem faster.  

You could almost have your characters running this fast before jumping.


Space them apart if you want to slow anything down.  Please film yourself, or download a clip of someone running or jumping.  Pay attention to the timing, or even the frame count between steps or jumps.  When you review your animations, compare them to your references and ask yourself "does this feel right?"  And please feel free to show me, or each other for feedback.  Sometimes it is hard to see what you need fix on your own work.  You will need someone else's eye to find the problems.

In the meantime, here is more inspiration and reference:


Homework
Finish up your run and jump animations.  I think for this assignment, you can turn in a persp, side, and Rendercam view.

Thursday, September 22, 2016

Class 5 09/20/2016

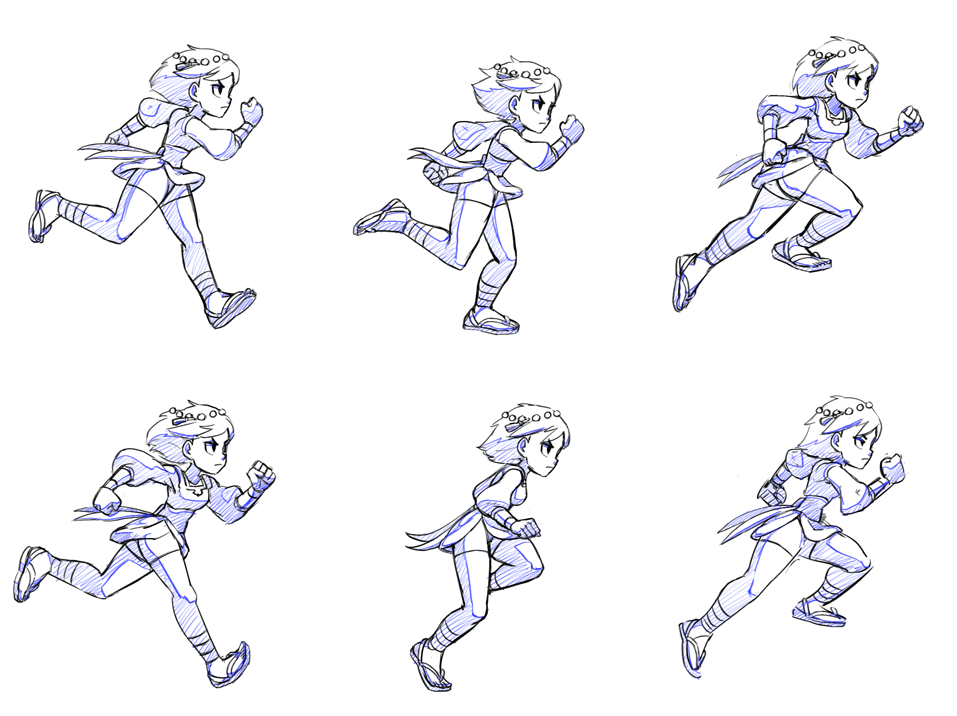
Last class I showed you guys how I would do a run or jump.  I showed you straight ahead animation, and quickly demonstrated pose to pose at the end of the class.

Here is a great video about it:

Here are the run jump examples I showed in class:
http://framexframe.tumblr.com/post/131747642902/studio-ghiblis-when-marnie-was-there
http://framexframe.tumblr.com/post/128186142038/glen-keanes-duet
http://framexframe.tumblr.com/post/118282198064/disneys-the-great-mouse-detective

Other drawings:


Drawing examples from a pixar animator, for planning his animation:
https://www.flickr.com/photos/victor_navone/collections/72157630141875812/


HOMEWORK
Revise your run cycles and bring them into class

Block out your animations for running and jumping.  Please bring in quicktimes showing the side view and any kind of persp view you would like to set up.

If you are doing pose to pose animation, please keep in mind to make as many keys and poses as you need to sell the idea.  There is no limit.  The more you lay down, the easier it might be to spline the animation.