Thursday, December 7, 2017

BFA 3D Animation Class 13 12/07/2017

Head Turn Animation

Hello everyone!  

Topics cover in class:

One important point I wanted to impress upon you is to make sure and keep both eyes on the screen facing the camera.  The eyes are important for emotional connections.  If we lose an eye we might lose that connection.

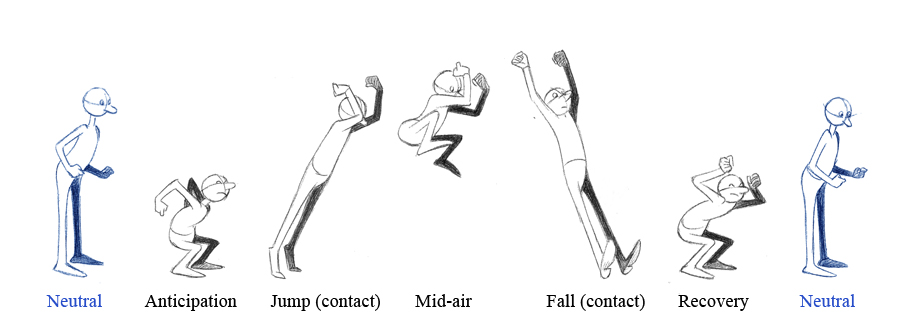
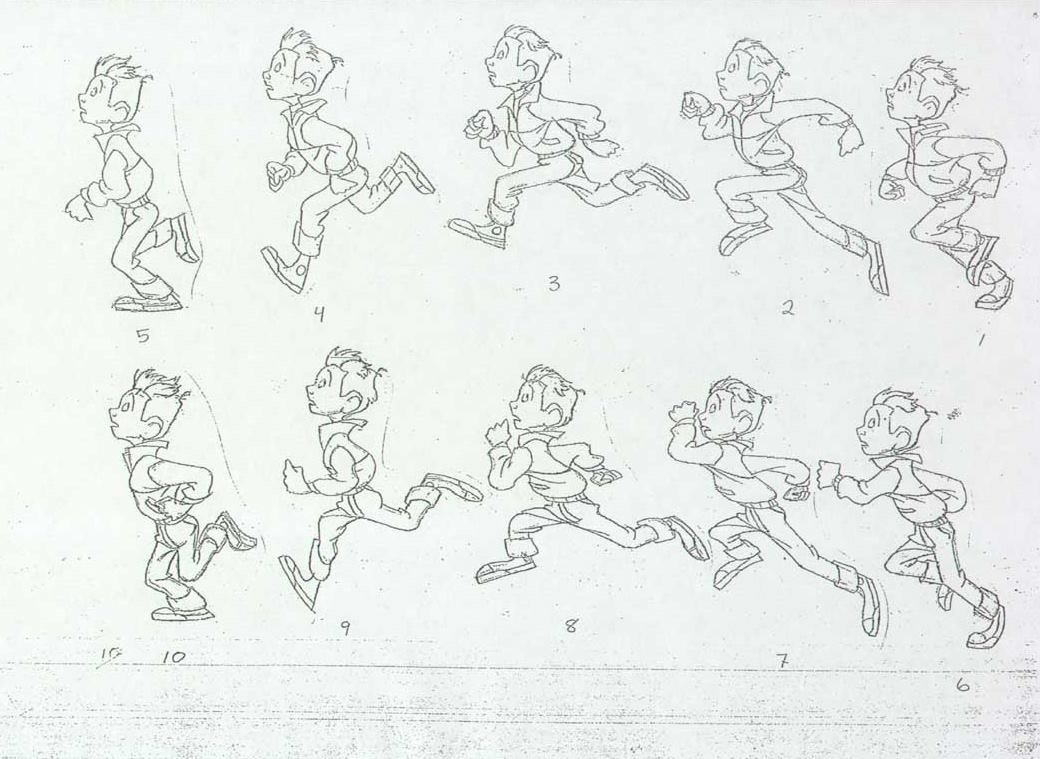
For the demonstration, I blocked out key poses for a head turn animation, and added a change of emotion at the end.  You can see my key poses in the maya scene I have sent to you.  My poses are by no means an exact blue print.  I think it was sufficient to get my idea across.  You may need more or less depending on what you decide to do.  This is why using reference video will be very useful for this exercise.

I also made sure to take care when posing facial expressions.  I wanted to keep them interesting and asymmetrical.  This might mean opening one eye more than the other, offsetting the mouth from the center, or changing the eye brow shapes.

Here is Carlos Baena's article about eye brows.

Here is Carlos Baena's article about eye blinking.


Here are some helpful references on the topic of head turning.  Hopefully these will reiterate what I went over in class, and you can use these as helpful reference for when you are doing your homework assignment.

________________________________________

**IF THERE IS ONE VIDEO I WANT YOU TO WATCH IT IS THIS ONE, WHERE AN ANIMATOR SHOWS YOU HOW HE BLOCKS OUT HIS HEAD TURN.**  Sorry for the caps lock and the yelling.  I just wanted to make sure you read this <3.

<3<3<3<3<3<3
____________________________________

Please take note, there are many different ways to do a head turn.  A neutral head turn is completely valid, but whatever the emotion of the character might be would also affect how the turn is happening.  


Other videos we watched in class:


Chuck Jones - The Evolution of an Artist from Tony Zhou on Vimeo.
Analysis of legendary animation director Chuck Jones and how he approached developing characters.  Because he set down rules and very defined personalities, he was able to effectively create vivid believable characters.  He has also mastered the art of communicating comedy and character through limited facial expression.


One More Beer! from pedro conti on Vimeo.

Great character animation that tells a story and shows you who the character is just by using the eyes.


Mother (2009) - Telephoto Profile Shots from Tony Zhou on Vimeo.


Analysis of a great Korean film director who broke the rules of showing both eyes in order for the audience to feel disconnected and helpless while watching the characters.


Since animation is acting, much of what Micheal Caine is talking about here is relevant to what we do as animators.


HOMEWORK

Based on what was shown in class, and the reference I provided in this blog post, please create your own head turn.  

Don't forget to create a new perspective camera to view our animation with.  I usually rename it "RenderCam" which is what many studios do.  Find a good place for this camera, and lock it in place by locking attributes, or just keyframe it.  Make sure this camera view is the best angle for viewing your work.  Remember what I said about the eyes.  Our animations will work much better when we see both eyes in the shot.  Use your RenderCam to figure that out.

I forgot to mention this in class, but I would like to REQUIRE you to record yourself a  turning your head and looking.  Do it a few times and pick the best one.  Turn it in with your animation progress!

Think back to your assignment when you posed out the character to your drawings.  You are essentially doing the same thing, but with poses that are sequential.

So in summary I want to see:
1 blocked animation of a head turn.
1 video of your filmed reference.

Thursday, November 30, 2017

BFA 3D Animation Class 12 11/30/2017

Hello Class!

Notes from today's demonstration:

-Splining the jump animation.

-It's ok to key every frame when you are finalizing your animation.

-Watch out for gimbal lock on the arms.  Keying every frame helps.

-When raising the shoulders, make sure you are using the clavicles as well.

-Use motion trails to view your character's movement, and arcs.  I demonstrated checking on my arm arcs, but you could also check for your feet as well.

-Many hold poses in stepped keframe no longer work when you spline.  Make sure you set extra keys so your poses hold.

-I sped up and slowed parts of my animation to make sure it moved and felt physically believable.  I did this by shifting keyframes to allow for more or less time in between.

-Try to angle the spine along the path that the character is flying.

Frame x Frame examples:
Slipping
http://framexframe.tumblr.com/post/112696403405/disneys-the-hunchback-of-notre-dame
http://framexframe.tumblr.com/post/119442334001/studio-ghiblis-the-wind-rises-kaze-tachinu

Animations viewed in class:

Thought of You from Ryan J Woodward on Vimeo.
Making of:

Popeye Movie Test:


Homework!

Finish your run cycles!  Please playblast 3 different camera views for your animation.  Front, Side, and Persp.  Email them to me before the beginning of the next class!

Monday, November 20, 2017

BFA 3D Animation Class 11 11/15/2017

Hello,

Last night we covered jumping.


I also showed you how to jump from a higher level to a lower level, using reference from the Great Mouse Detective.

I used stepped keys.

Here is a great video about pose to pose animation:

Here is the jump example I showed in class:

http://framexframe.tumblr.com/post/118282198064/disneys-the-great-mouse-detective

Other drawings:


These are drawing examples from a pixar animator, for planning his animation.  This can be useful for planning your poses ahead of time without opening maya:

https://www.flickr.com/photos/victor_navone/collections/72157630141875812/


Here is the animation evolution reel I showed to you in class.  Use this as inspiration for how you will block out and time your poses.
Evolution Reel from jeff gabor on Vimeo.


HOMEWORK
-Begin blocking out your jump animations.  Please bring in quicktimes showing the side view and any kind of persp view you would like to set up.

-Above, I've posted examples of running and jumping animation.  This is different from what I demonstrated in class.  However, if you would like to try this, please feel free.

When doing pose to pose animation, please keep in mind to make as many keys and poses as you need to sell the idea.  There is no limit.  The more you lay down, the easier it might be to spline the animation.

Thursday, November 9, 2017

BFA 3D Animation Class 10 11/8/2017

Hi Gang, 

Today I:

-Critiqued your run cycles.

-Showed how to move your character through the world.

-Showed how to move your animation away from the Master Control using the lattice tool in the graph editor.  You mainly need to worry about the Z channel with your IK feet and your COG control.

-Tried to demonstrate an older way I was taught how to do a walk cycle.  It did not go well!

-Demonstrated overlapping animation in the head of the character.  This seemed to be a struggle for a lot of people in the class.


Glenn Keane's Duet


Homework

Finish your run cycles and send me quicktimes in 3 views!

Thursday, November 2, 2017

BFA 3D Animation Class 9 11/1/2017


This class we took a look at your walk cycles and then I demonstrated a run cycle.

Items covered in class

-With run cycles, the feet both leave the ground.
-Elbows usually stay bent.

-Posed out the run cycle.
   -While in stepped keyframes, I determined my animation timing.

-Splined the run cycle.

-Altered timing of the run cycle so that the character holds in the air longer, and moves faster when the feet are on the ground.

Run Cycles

Here are some references for your run cycles.


This video shows something that is interesting to note.  This girl is shown landing on the balls of her feet instead of her heel, which is what I showed you in class.  That's ok!  That's very realistic, since jogging this way is better for your knees.


Chiari Porri
I recently found this animator's vimeo page from a friend.  She has great tutorials on how she does and walk and run cycle.  Please watch these so you can supplement what you already know.  

BTW I know this eleven rig seems appealing, but as you can see from her walk cycle video starting in Maya 2015, the rig starts to break.
HOMEWORK

Next do a first pass run cycle!  
-Please playblast 3 quicktimes, one for each camera angle.  Those angles are front, side, and RenderCam.  Please email them before class begins.  We will critique them at the beginning of class.

Wednesday, October 18, 2017

BFA 3D Animation Class 7 10/18/2017

Hello everyone.  Today we looked at how to create a walk cycle.

Topics covered in class:


-Creating a RenderCam
In one of your viewports you can create a new persp cam and rename it to RenderCam.  Use this as the camera that you playblast from, while you use the default persp as your work camera.

-Animating a walk cycle in place.

-Posing key poses for walk cycle using the animators survival guide as reference.
 Adding break down poses in between the key poses.
Spacing the key frames of the poses so that the timing works right.

-Mechanics

 Feet alternate opposite the arms. Example is when right foot is forward, left foot is back
 Hips and shoulders have opposing rotations.
 Torso moves up and down.
 When animating feet, use heel and ball roll channels to move foot on appropriate pivots.
 Animate torso, chest and head to feel the weight of the body moving up and down.

-Setting timeline so that your last frame isn't rendered when playblasting.  The last and first frame will be the same and you dont want that frame playing twice when you are looping.

-Cycling Animation in Graph Editor.

Have infinity turned on to preview the curve.

-Tweening and mirroring in aTools

Atools for maya at home (click to save)

Tutorial Video on aTools:


Walk cycle images:

This man here is an inspiration.  This person was not an animator before, but he decided he wanted to try it.  Everyday for 100 days, he tried to animate a walk cycle.  You can see him getting better and better with each try.


Other Walk Cycles:


Other Tutorials:


Felix Sputnick's animation videos, which are very insightful


Eadweard Muybridge, the photographer who studied motion.

Homework!

Please put together a first pass of your walk cycles.  Don't forget to use aTools to save time. Use the images provided if you need references for which poses you would like to have in your walk cycle.  Please work on your poses and timing until you feel like they look like good walk cycles.  For assistance please use the material I have provided.  It is useful to see how other people work on walk cycles.  Perhaps their method is better for you than what I showed!

For next class I would like to see a quicktime of your walk cycles and your references if you have them.  Please playblast them and email them to me before class begins.  We will then take those and I will show you how to take them a step further and refine them.

If you need help or advice, please send me an email!

Thursday, October 12, 2017

BFA 3D Animation Class 6 10/12/2017

Topics covered in the last class.

I opened up the Bonnie rig file so I could re-connect the texture paths.  
-Open Hypershade, and click the file tab
-select the first file and correct the file path so it points to the file inside the sourceimages folder that came with the rig.
-for the next few textures, you can just click once on the sample thumbnail at the top of the file attribute editor.  Maya will figure out the real path for everything else with each click.

Because the hair use .PSD files and transparencies, it cause some issues with the display in viewport 2.0.  Instead I made a new Lambert Shader and applied it to the hair.  I have done this to the rig and have emailed this new version to you.

Once the file textures are reconnected, save the file.

When I was ready to pose, I created a new file, and referenced the Bonnie rig.

I then went through how the rig works
-COG control is near the hips and is used to move the body around.
-IK/FK Arms and legs.  Use IK if you want the arm or leg to stick somewhere.  Use FK for more direct control of the rotations.
-For this exercise, leave the feet on IK and leave the arms on FK.
-Pole Vector objects are used to point the elbows or knees while in IK.  Usually I set it's parent space to the IK ctrl.  That means if you move the foot, the pole vector will follow it.
-The shoulders and head have this option for align.  By default it is set to 1, which means "on".  When align is on, it maintains it's rotational position as you move the body around.
-Ribbon controls for arms and legs help you define more curvy shapes.
-For the eye control, I like to have it parented to the head, so when I move the character around, I don't have to worry about losing it, or having the eyes roll back into the head.

I showed you how I would like you to key each pose on different frames.


If you have trouble with any of these topics just google search them or ask me for clarification.


Homework:

Take your drawings that you did at the beginning of the semester, and create poses with the Bonnie rig.  I want to see 10 poses total.

Playblast these 10 frames into a quicktime and send them to me before class next week.

One thing I forgot to mention last class is to pay attention to how you pose to your camera.  When you playblast make sure your pose is at the best angle to the camera.  If you need to rotate your character for one frame, use the root, and key it.  Posing the face is optional.