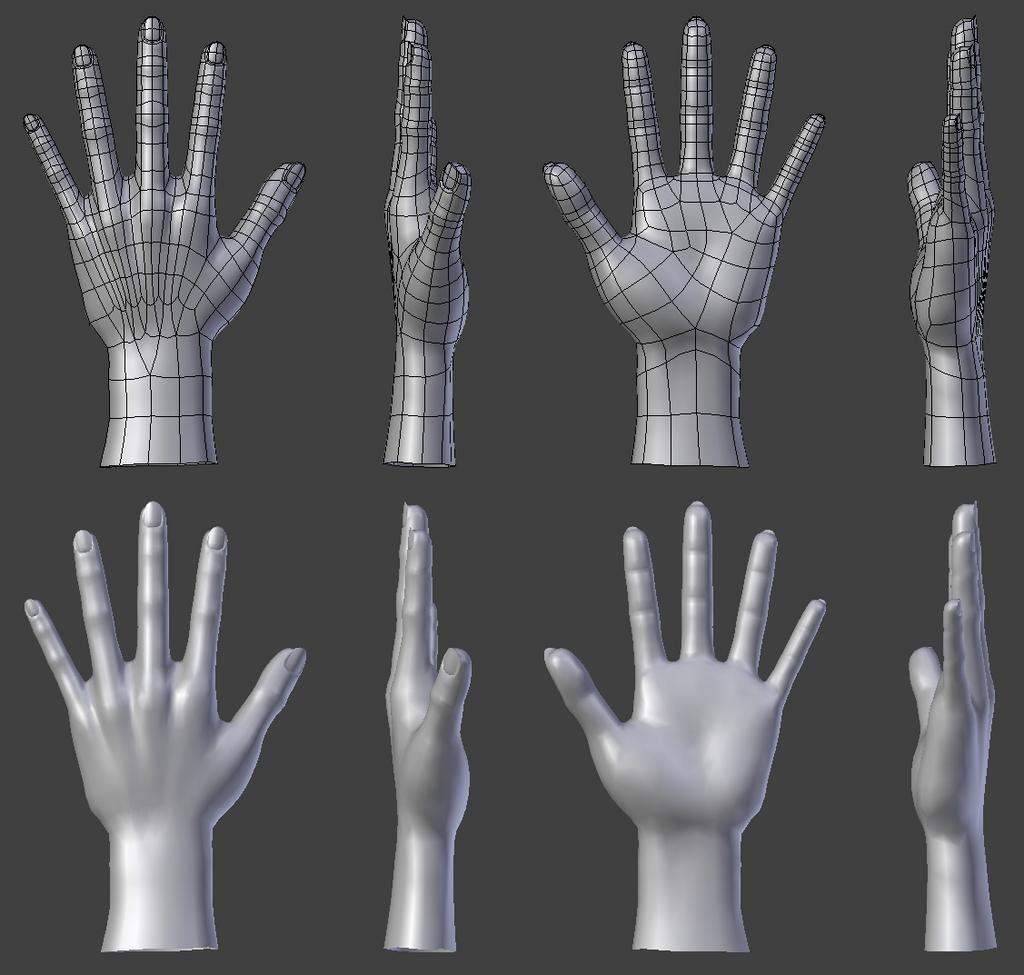
Hi Class! Here you will find some other reference material for modeling a hand. You might notice some people do it differently than what I've shown you, which is ok. The point is to get familiar with the tools made available to you in Maya. Perhaps you will find a method that will work for you! Please explore these tutorial videos to get a sense for how other artist tackle the same problem. Like I've said, there is a wealth of knowledge out there!
Extrude -Use to extrude polygons from a selected face or edge.
-Remember that the extrusion comes with a local manipulator that allows you to move it locally from it's origin. The world manipulator may not be as helpful.
-Selecting a face, and moving it while holding SHIFT can extrude, but it can cause issues, so it's best not to use it this way.
-Use these operations to create a new shape based on the intersecting input shapes.
-The three operations are Intersection, Union, and Difference.
-Selection order affects the shape that is created. For example, if you want to punch a hole through a cube using a cylinder, you would select the cube first and the cylinder second.
Deformers
-Lattice deformer builds a cage around a mesh that you can manipulate in component mode. This allows you to modify your mesh in broad strokes.
-Non Linear Deformers are used to create different deform effects like bend, twist, squash, etc.
-Used to merge or weld vertices or edges to each other.
Normals -Hard/soft changes the way polys are displayed in maya. Softened edges are harder to see, while harder edges clearly define the polys. Sometimes you may need to toggle this when you are modeling when edges are hard to distinguish.
-Reversed Normals, appearing black, makes it's hard to see your mesh. Sometime this can happen with a bad extrusion, or in other situations. To fix, just select the face and reverse those normals. Create Poly
-Tool that allows you to draw vertices to create a polygon.
Nurbs Curves
-Nurbs curves can be useful tools to assist in modeling.
-IMPORTANT NOTE: By default these tools create Nurbs surfaces. I dislike nurbs as you might know, so I like to set the options for these to creat Polygons as Quads, with Count. Play with the number for Count to see how much is right for you. HOMEWORK With object manipulation, grouping, and modeling tools, make any kind of furniture you like!
Shape options are in the option menu, but also in the shape history under the channel editor.
Translate Rotate and Scale
W is translate
E is rotate
R is scale
Tool options
Moving in Object and World Space
Manipulating a Camera
Moves just like a maya object.
Camera Settings
Clipping Plane changes how far and how close the camera will render an object. Can be used to fix glitchy geometry
Focal Length is used to change how much perspective the camera shows. High number flattens the camera’s view, while a low number exaggerates the perspective.
Selection Masks
Disable or enable what is selectable in the Viewport window
Hide/show for visibilty
Ctrl + H to hide
Shift + H to show again
Touch on Hypergraph
Hierarchies
Manipulator + -
Make the manipulator physically larger or smaller. Larger manipulator makes it easy to have precision.
Channel editor
Select a channel and middle mouse drag to change the values.
Math can be done inside the channel box.
+=, -=, *=, /=
Changing pivot
Insert(Pc)/Home(Mac) to enable change pivot mode.
Alternative is to hold “D” to move the pivot.
Modify>Center Pivot to bring it back to the center of the object or group.
Point and grid snap
Hold x to grid snap, and v to point snap. To keep these turned on you can press the button at the top of maya.
Groups/locators
Same object essentially. Locators are groups that can be grabbed in the viewport. If you delete the shape node of the locator, it becomes a grou null.
Use these to organize objects in the outliner or in a hierarchy.
Freeze transformation
Zero’s out all transform values.
Parenting and Grouping methods/hotkeys
p to parent.
Shift p to unparent
Ctrl g to group
In the outliner you can select object and middle mouse drag them into another object or group, making it a child.
Organize your Outliner!
Groups objects and keep your outliner organized in case someone else needs to open your file.
Assignment:
Please use what you have learned about navigating Maya, and the manipulator tools in class to build anything you like. The point of this project is to have fun and become familiar with the fundamentals of moving and organizing objects in Maya. I will not be checking these, but if you would like to share with the class please place them in your student folders on the server.
Hello Class! Here is a small overview of the topics I covered in yesterday's class.
Maya Menus
Options - The little square next to each tool allows deeper customization options for whatever you are using. Most menu windows have a help page specific to which ever tool you are opening.
Shelves - most used maya functions layed out for quick access, but no access to the options. Options can sometimes be accessed if you have the tool editor opened.
Left tool Window
No tool Q, Translate W, Rotate E, Scale R.
Different maya viewport options below that.
Right Window
Channel Box - Info on X,Y,Z values for translate, rotate and scale.
Attribute Editor - Under the hood info on whichever object you have selected.
Tool Editor - Setting for currently active tool.
Timeline- used for animation. Will go more in depth later in the course.
Viewport Panel options -
Adjust what you see in your view port work area
4 for wireframe, 5 for smooth shaded, 6 for textures, 7 for lights.
Spacebar used to switch between different camera views
Other Windows
Outliner- Keeps track of all objects in your scene and their hierarchies.
Hypershade - Workspace for shaders
Graph Editor - Workspace for animation
Project Window, and Setting a Project Window - used to set up your maya project folders, and connect Maya to that structure for fast referencing, and file access.
Here is a great video talking about what I showed you last night, plus some extra stuff I may not have covered.
One important point I wanted to impress upon you is to make sure and keep both eyes on the screen facing the camera. The eyes are important for emotional connections. If we lose an eye we might lose that connection. For the demonstration, I blocked out key poses for a head turn animation, and added a change of emotion at the end. You can see my key poses in the maya scene I have sent to you. My poses are by no means an exact blue print. I think it was sufficient to get my idea across. You may need more or less depending on what you decide to do. This is why using reference video will be very useful for this exercise.
I also made sure to take care when posing facial expressions. I wanted to keep them interesting and asymmetrical. This might mean opening one eye more than the other, offsetting the mouth from the center, or changing the eye brow shapes.
Here is Carlos Baena's article about eye blinking. Here are some helpful references on the topic of head turning. Hopefully these will reiterate what I went over in class, and you can use these as helpful reference for when you are doing your homework assignment.
**IF THERE IS ONE VIDEO I WANT YOU TO WATCH IT IS THIS ONE, WHERE AN ANIMATOR SHOWS YOU HOW HE BLOCKS OUT HIS HEAD TURN.** Sorry for the caps lock and the yelling. I just wanted to make sure you read this <3.
<3<3<3<3<3<3
____________________________________
Please take note, there are many different ways to do a head turn. A neutral head turn is completely valid, but whatever the emotion of the character might be would also affect how the turn is happening.
Other videos we watched in class:
Chuck Jones - The Evolution of an Artist from Tony Zhou on Vimeo. Analysis of legendary animation director Chuck Jones and how he approached developing characters. Because he set down rules and very defined personalities, he was able to effectively create vivid believable characters. He has also mastered the art of communicating comedy and character through limited facial expression.
Analysis of a great Korean film director who broke the rules of showing both eyes in order for the audience to feel disconnected and helpless while watching the characters.
Since animation is acting, much of what Micheal Caine is talking about here is relevant to what we do as animators.
HOMEWORK
Based on what was shown in class, and the reference I provided in this blog post, please create your own head turn. Don't forget to create a new perspective camera to view our animation with. I usually rename it "RenderCam" which is what many studios do. Find a good place for this camera, and lock it in place by locking attributes, or just keyframe it. Make sure this camera view is the best angle for viewing your work. Remember what I said about the eyes. Our animations will work much better when we see both eyes in the shot. Use your RenderCam to figure that out.
I forgot to mention this in class, but I would like to REQUIRE you to record yourself a turning your head and looking. Do it a few times and pick the best one. Turn it in with your animation progress! Think back to your assignment when you posed out the character to your drawings. You are essentially doing the same thing, but with poses that are sequential. So in summary I want to see: 1 blocked animation of a head turn. 1 video of your filmed reference.
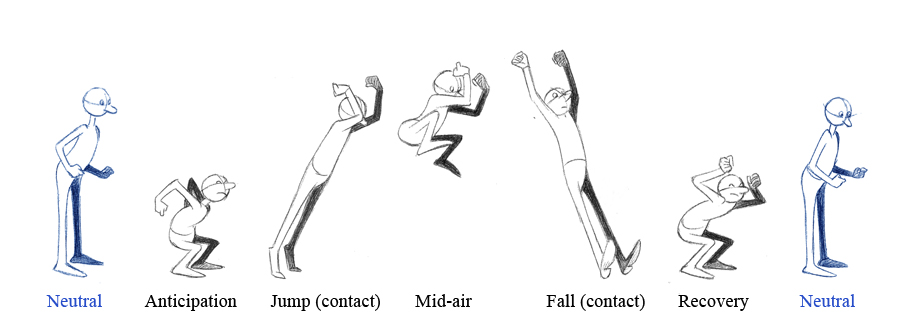
Hello Class! Notes from today's demonstration: -Splining the jump animation. -It's ok to key every frame when you are finalizing your animation. -Watch out for gimbal lock on the arms. Keying every frame helps. -When raising the shoulders, make sure you are using the clavicles as well. -Use motion trails to view your character's movement, and arcs. I demonstrated checking on my arm arcs, but you could also check for your feet as well. -Many hold poses in stepped keframe no longer work when you spline. Make sure you set extra keys so your poses hold. -I sped up and slowed parts of my animation to make sure it moved and felt physically believable. I did this by shifting keyframes to allow for more or less time in between. -Try to angle the spine along the path that the character is flying. Frame x Frame examples: Slipping http://framexframe.tumblr.com/post/112696403405/disneys-the-hunchback-of-notre-dame http://framexframe.tumblr.com/post/119442334001/studio-ghiblis-the-wind-rises-kaze-tachinu Animations viewed in class: Thought of You from Ryan J Woodward on Vimeo. Making of:
Popeye Movie Test:
Homework!
Finish your run cycles! Please playblast 3 different camera views for your animation. Front, Side, and Persp. Email them to me before the beginning of the next class!
Hello, Last night we covered jumping. I also showed you how to jump from a higher level to a lower level, using reference from the Great Mouse Detective. I used stepped keys.
Here is a great video about pose to pose animation:
Here is the animation evolution reel I showed to you in class. Use this as inspiration for how you will block out and time your poses. Evolution Reel from jeff gabor on Vimeo.
HOMEWORK
-Begin blocking out your jump animations. Please bring in quicktimes showing the side view and any kind of persp view you would like to set up. -Above, I've posted examples of running and jumping animation. This is different from what I demonstrated in class. However, if you would like to try this, please feel free. When doing pose to pose animation, please keep in mind to make as many keys and poses as you need to sell the idea. There is no limit. The more you lay down, the easier it might be to spline the animation.